locust编码指引
如何并发
如果需要峰值并发“500个用户/秒”,
则可以设置wait_time = constant_throughput(0.1),和用户数设定为5000
from locust import User, task, between, constant_throughput

class MyUser(User):
    @task
    def my_task(self):
        print("executing my_task")

    wait_time = constant_throughput(0.1)
官方文档有一句话还没理解
https://docs.locust.io/en/stable/writing-a-locustfile.html#user-class
Wait time can only constrain the throughput, not launch new Users to reach the target. So, in our example, the throughput will be less than 500 if the time for the task iteration exceeds 10 seconds. 步梯并发
让请求时间梯步递增的例子,请求会间隔1s,2s,3s一直递增(请求越来越慢)
from locust import User, task, between

class MyUser(User):
    last_wait_time = 0

    @task
    def my_task(self):
        print("executing my_task")

    def wait_time(self):
        self.last_wait_time += 1
        return self.last_wait_time
并发组合权重
设置并发比重
如下代码所示,如果设置为Number of users为3,Spawn rate为1
则MyUser和MyUser的执行比例接近1:2
from locust import User, task, between

class MyUser(User):
    weight = 1

    def my_task(self):
        print("MyUser Go")

    wait_time = between(2, 2)


class MyUser2(User):
    weight = 2

    @task
    def my_task(self):
        print("MyUser2 GoGoGo")

    wait_time = between(2, 2)
另外一个示例
task1:task2 = 3:6
class MyUser(User):
    wait_time = between(1, 1)
    task1_num, task2_num = 0, 0

    @task(3)
    def task1(self):
        self.task1_num += 1
        print("task1")

    @task(6)
    def task2(self):
        self.task2_num += 1
        print("task2")

    def on_stop(self):
        print("task1_num:", self.task1_num)
        print("task2_num:", self.task2_num)
实际执行的过程并不是3次task1然后6次task2,截取了一部分执行输出如下所示
task2
task2
task2
task2
task2
task2
task1
task2
task2
task2
task2
task2
task2
task1
task2
task1
task2
task2
task2
task2
task2
task1
task2
测试几百次输出后,结束压测任务,可以看到输出结果,是按大致比例进行的,也就是没有说一定是3次task1后6次task2
task1_num: 161
task2_num: 311
161/311 ≈ 0.518,近似3/6 = 0.5
按标签执行
假如我们为每个方法添加tag
from locust import User, constant, task, tag

class MyUser(User):
    wait_time = constant(1)
    task1_num, task2_num, task3_num, task4_num = 0, 0, 0, 0

    @tag('tag1')
    @task
    def task1(self):
        self.task1_num += 1
        print("task1")

    @tag('tag1', 'tag2')
    @task
    def task2(self):
        self.task2_num += 1
        print("task2")

    @tag('tag3')
    @task
    def task3(self):
        self.task3_num += 1
        print("task3")

    @task
    def task4(self):
        self.task4_num += 1
        print("test4")

    def on_stop(self):
        print("task1_num:",self.task1_num)
        print("task2_num:", self.task2_num)
        print("task3_num:", self.task3_num)
        print("task4_num:", self.task4_num)
运行时添加标签,指定只运行tag1标签的方法
locust --tags tag1
最后停止时输出的结果为
task1_num: 23
task2_num: 28
task3_num: 0
task4_num: 0
也即是,Locust允许像robotframework那样按照划分好的用例标签来运行一类用例
初始化locust线程
官方是说,这个方法尤其在多个实例的情况下比较实用,每个实例可能都需要初始化不一样的信息
from locust import events
from locust.runners import MasterRunner

@events.init.add_listener
def on_locust_init(environment, **kwargs):
    if isinstance(environment.runner, MasterRunner):
        print("I'm on master node")
    else:
        print("I'm on a worker or standalone node")
使用HttpUser类
HttpUser是最常用的User类,因为日常中发送Http Request是最多的,HttpUser自带了get、post等处理方法
from locust import HttpUser, task, between

class MyUser(HttpUser):
    wait_time = between(5, 15)

    @task(4)
    def index(self):
        self.client.get("/")

    @task(1)
    def about(self):
        self.client.get("/about/")
这里的client是HttpSession的实例,为此,clinet也具备携带session能力
举个例子,先从post方式登录,则后面的请求都自动携带了认证信息,无需手动携带
# 登录处理
response = self.client.post("/login", {"username":"testuser", "password":"secret"})
print("Response status code:", response.status_code)
print("Response text:", response.text)
# 请求有鉴权的页面
response = self.client.get("/my-profile")
示例:获取运营后台的搜索基础配置信息
from locust import constant, task, HttpUser, events

class MyUser(HttpUser):
    wait_time = constant(1)

    @task
    def task6(self):
        # client具备了session能力,不需要重复实现认证
        resp = self.client.get("https://admin3.rrzuji.net/super/operation-v3/config-base?configType=base.conf.search.content")
        print("基础信息配置:", resp2.text)

    def __init__(self, *args, **kwargs):
        # 注意重写init方法需要使用super()把父类的init有的方法和属性都继承过来,不然下面的self.client会被识别为NoneType
        super().__init__(*args, **kwargs)
        request_form = {
            "LoginForm[username]": "15989259527",
            "LoginForm[password]": "123456",
            "LoginForm[sms_code]": "",
            "login_type": "passwd_login"
        }
        # 全局client
        self.client.post("https://admin3.rrzuji.net/site/login", request_form)
响应response校验
把response信息进行校验处理
from locust import constant, task, HttpUser, events

class MyUser(HttpUser):
    wait_time = constant(1)

    @task
    def respone_test_task(self):
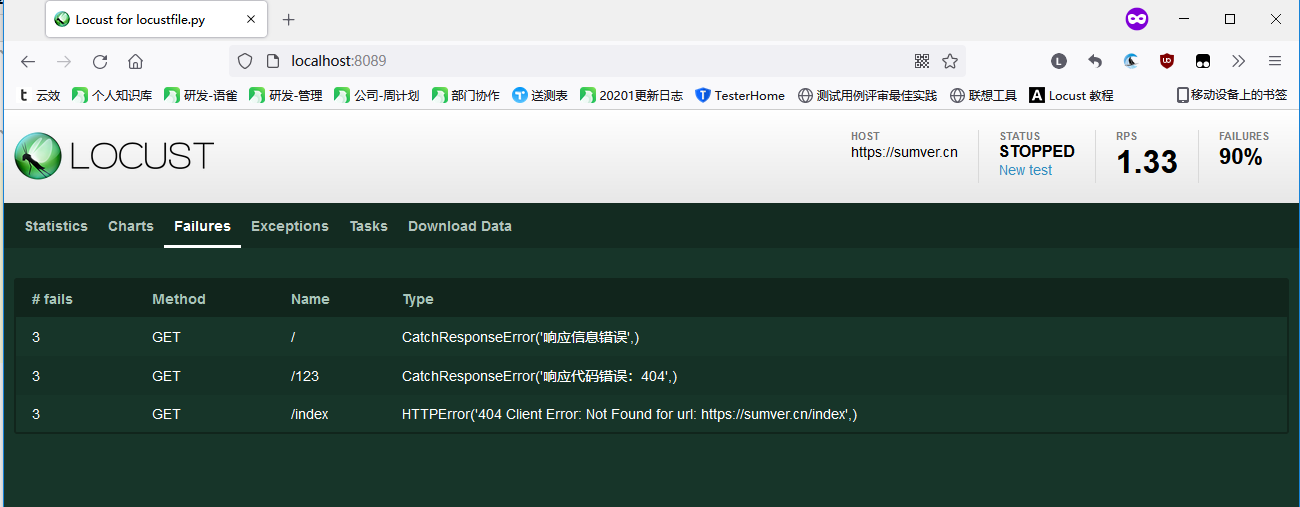
        with self.client.get("/", catch_response=True) as response:
            if response.text != "Success":
                response.failure("响应信息错误")

        with self.client.get("/123", catch_response=True) as response:
            if response.status_code != "200":
                response.failure(f"响应代码错误:{response.status_code}" )

        with self.client.get("/index", catch_response=True) as response:
            if response.elapsed.total_seconds() > 0.3:
                response.failure(f"响应时间超过0.3秒:{response.elapsed.total_seconds()}")
这部分异常将会展示在locust的结果页
断言响应为json格式的信息
这个不多说,robot那边最多的方法都是response.json()去取值,使用方法完全一直
压测中,这个断言有两个作用:
1、如果出错,则会取不到预期值,比如我们期望的json是{"errno":"3000","message":"success"}
而如果出现服务器错误等异常,返回的可能是非json、或json是类似{"errno":"9000","message":"内部错误"},则可以正确会捕捉到
2、另一个主要作用是,并发下的数据准确性校验。
尤其是当该接口是多线程的情况下,则数据校验变得非常有必要。后端如果不加正确处理,就会导致串数据
这里我就直接用官方的demo来做示例,官方写的已经很通俗了
from locust import constant, task, HttpUser
from json import JSONDecodeError

class MyUser(HttpUser):
    wait_time = constant(1)

    @task
    def respone_test_task(self):
        with self.client.post("/", json={"foo": 42, "bar": None}, catch_response=True) as response:
            try:
                if response.json()["greeting"] != "hello":
                    response.failure("Did not get expected value in greeting")
            except JSONDecodeError:
                response.failure("Response could not be decoded as JSON")
            except KeyError:
                response.failure("Response did not contain expected key 'greeting'")
分组请求
正常情况下,如果你对一个不固定参数接口这么请求,比如
编号1 的文章链接:https://xxx.cn/index.php/archives/1
编号2的文章链接:https://xxx.cn/index.php/archives/2
写代码的时候这么写
from locust import constant, task, HttpUser
from json import JSONDecodeError

class MyUser(HttpUser):
    wait_time = constant(1)

    @task
    def task1(self):
        for i in range(5):
            # 378
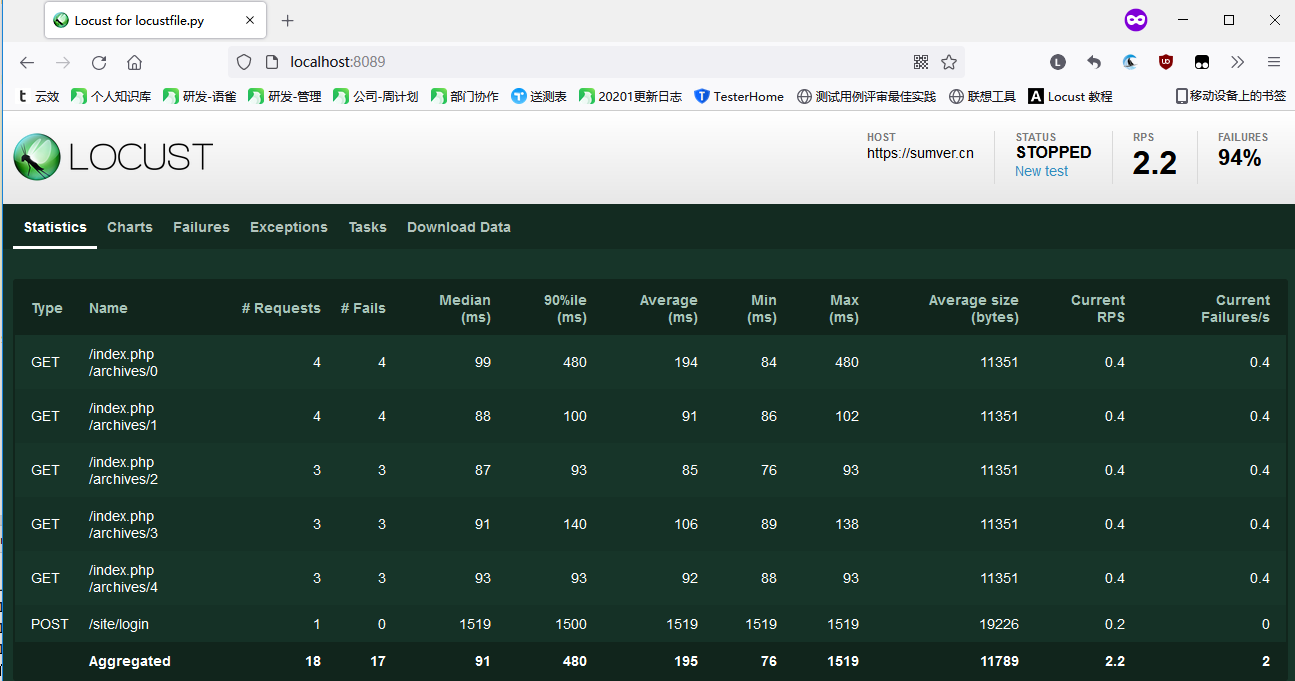
self.client.get(f"https://xxx.cn/index.php/archives/{i}")结果就是如图所示,每一个参数不同,都被当做是一个接口,如果文章有1000篇,这这里要显示为1000个URL,且我们无法统计到https://xxx.cn/index.php/archives/这个接口的平均响应时间
这里要聚合“类似的URL”,需要在请求时给这个URL进行命名(指定name名字):
from locust import constant, task, HttpUser
from json import JSONDecodeError

class MyUser(HttpUser):
    wait_time = constant(1)

    @task
    def task1(self):
        for i in range(5):
            url = f"/index.php/archives/{i}"
            self.client.get(url, name = "/index.php/archives/")
            print(url)
在IDE控制台可以看到循环输出不同的URL:
[2021-09-06 15:56:23,227] lonelylizard-LAPTOP/INFO/locust.runners: All users spawned: {"MyUser": 1} (1 total users)
https://xxxx.cn/index.php/archives/0
https://xxxx.cn/index.php/archives/1
https://xxxx.cn/index.php/archives/2
https://xxxx.cn/index.php/archives/3
https://xxxx.cn/index.php/archives/4
https://xxxx.cn/index.php/archives/0
https://xxxx.cn/index.php/archives/1
https://xxxx.cn/index.php/archives/2
https://xxxx.cn/index.php/archives/3
https://xxxx.cn/index.php/archives/4
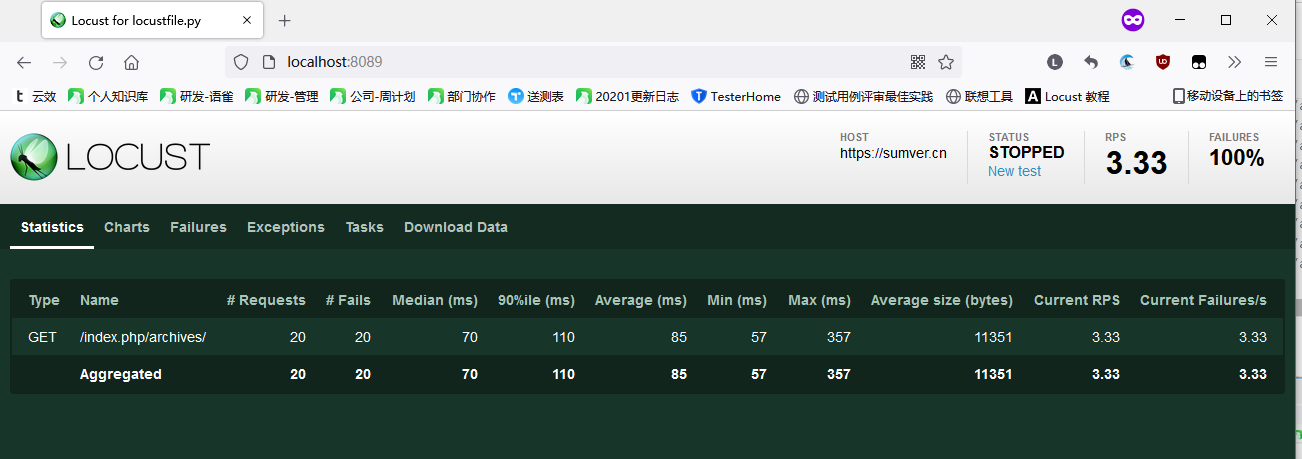
看一下Locust的报告,已经是把/index.php/archives/xxx聚合为一个接口了
官方给了两个例子是这样子的,这个例子个人感觉有点误解倾向,我一开始认为这个name = "/blog?id=[id]"中id是某种匹配规则,其实name只是“这类URL”
# Statistics for these requests will be grouped under: /blog/?id=[id]
for i in range(10):
    self.client.get("/blog?id=%i" % i, name="/blog?id=[id]")
# Statistics for these requests will be grouped under: /blog/?id=[id]
self.client.request_name="/blog?id=[id]"
for i in range(10):
    self.client.get("/blog?id=%i" % i)
self.client.request_name=None
我们来测试一下,把不同参数的url的name设定为一个毫无相关的链接
from locust import constant, task, HttpUser

class MyUser(HttpUser):
    wait_time = constant(1)

    @task
    def task1(self):
        for i in range(5):
            url = "/blog?id=%i" % i
            self.client.get(url, name="/abc")
            print(url)
在locust结果报告中的name就是请求里的对URL设定的别名。
也即是locust是使用URL别称来聚合报告的
分组请求下还可以使用client.rename_request来实现
这里直接拿官方demo,这个没啥好说的
@task
def multiple_groupings_example(self):

    # Statistics for these requests will be grouped under: /blog/?id=[id]
    with self.client.rename_request("/blog?id=[id]"):
        for i in range(10):
            self.client.get("/blog?id=%i" % i)

    # Statistics for these requests will be grouped under: /article/?id=[id]
    with self.client.rename_request("/article?id=[id]"):
        for i in range(10):
            self.client.get("/article?id=%i" % i)
官方推荐的压测项目结构
Project Root
- common/
- __init__.py
- auth.py
- config.py
- locustfiles/
- api.py
- website.py
- requirements.txt
执行前初始化on_start()
方法见on_stop(),类似
压测结束时执行on_stop()
如下代码,当你点击了停止运行按钮时,就会执行on_stop方法
下面的示例用来停止后统计出任务分别的执行次数
from locust import constant, task, HttpUser

class MyUser(HttpUser):
    wait_time = constant(1)
    # 任务执行次数统计
    task1_num, task2_num = 0, 0

    @task(3)
    def task1(self):
        pass

    @task(1)
    def task1(self):
        pass

    def on_stop(self):
        print("task1_num:",self.task1_num)
        print("task2_num:", self.task2_num)
locust命令
帮助命令:locust --help
执行指定locustfile文件(哪怕文件名不是locustfile):locust -f {文件名.py}
指定配置文件:locust --config {congfig的文件路劲}
指定服务器:locust --host {http://服务器地址或域名}
指定用户数(这个还没理解完):locust --users
-u NUM_USERS, --users NUM_USERS Peak number of concurrent Locust users. Primarily used together with --headless or --autostart. Can be changed during a test by keyboard inputs w, W (spawn 1, 10 users) and s, S (stop 1, 10 users)
指定时间后停止运行:locust -t {运行时间,比如300s,3h,20m,1h30m,etc}
下面这个没看懂
-l, --list Show list of possible User classes and exit
主参考这里:
https://docs.locust.io/en/stable/configuration.html
locust常用命令
无界面进行压测
locust -f {压测文件的.py} --headless -u 1000 -r 100运行期间可以按w增加一个用户,按W可以增加10个用户,按s、S分别对应减少1、10个用户
限时压测
locust 0f --headless -u 1000 -r 100 --run-time 1h30在一个半小时后压测将会停止
在停止压测时,让未执行完的线程(请求)执行完(而不是中断),需要使用--run-time指定迭代次数
locust -f --headless -u 1000 -r 100 --run-time 1h30m --stop-timeout 99这里说一下默认情况
默认情况下,执行了压测命令locust后,都会关闭还没执行完任务的线程。
我这里用如下方法测试有界面的Stop的情况:
让一个任务在请求后输出之前,等到5秒;在等待期间把点击界面上的Stop
from locust import constant, task, HttpUser
import time

class MyUser(HttpUser):
    # wait_time = constant(1)

    @task
    def task1(self):
        with self.client.get("/", catch_response=True) as response:
            if response.status_code == 200:
                time.sleep(5)
                print("状态码为200,正常")
结果就是locust报告中统计了Request为1,也即是没执行完的结果都被抛弃掉。我想这个的好处就是不会把因中断导致的异常数据统计到报告里(jmeter中断执行时就会把这部分异常一并统计到数据中)
对压测结果返回指定代码
官方这里举的例子是在CI系统(比如jenkins)里,CI系统需要知道压测结果代码来执行输出报告
设置运行结束代码,需要在Environmet实例中
这里设定了一个简单的场景,总是请求https://www.baidu.com/123,这个链接的状态码为404,为此构造失败率为100%的情况,错误代码预期返回1
# 文件名:locustfile.py
from locust import constant, task, HttpUser, events
import logging


class MyUser(HttpUser):
    # wait_time = constant(1)

    @task
    def task1(self):
        with self.client.get("/123", catch_response=True) as response:
            if response.status_code != 200:
                response.failure(f"响应代码错误:{response.status_code}")

    @events.quitting.add_listener
    def _(environment, **kw):
        if environment.stats.total.fail_ratio > 0.01:
            logging.error("Test failed due to failure ratio > 1%")
            environment.process_exit_code = 1
        elif environment.stats.total.avg_response_time > 200:
            logging.error("Test failed due to average response time ratio > 200 ms")
            environment.process_exit_code = 2
        elif environment.stats.total.get_response_time_percentile(0.95) > 800:
            logging.error("Test failed due to 95th percentile response time > 800 ms")
            environment.process_exit_code = 3
        else:
            environment.process_exit_code = 0
编写一个调用程序ci_timer.py,来接受locust的返回代码,设定执行5秒后退出
# 文件名:ci_timer.py
import os

run_locust = 'locust --headless -H https://www.baidu.com -u 1 -r 1 --run-time 5s'
print("返回代码:", os.system(run_locust))在命令行里执行:python ci_timer.py
在5秒后看到输出结果:返回代码: 1
这里有个小细节,我在pycharm里执行run这个ci_timer,是得不到print的结果的,只是控制台RUN的TAB页报告了当前ci_timer的代码运行结果:Process finished with exit code 0
这个结果不是locustfile.py的返回结果代码,是ci_timer的返回结果代码。
步梯压测
假设我们已步梯为100个用户的情况递增,每次+100
from locust import LoadTestShape, HttpUser, task


class MyUser(HttpUser):
    # wait_time = constant(1)

    @task
    def task1(self):
        with self.client.get("/123", catch_response=True) as response:
            if response.status_code != 200:
                response.failure(f"响应代码错误:{response.status_code}")


class MyCustomShape(LoadTestShape):
    time_limit = 600
    spawn_rate = 20

    def tick(self):
        run_time = self.get_run_time()

        if run_time < self.time_limit:
            # User count rounded to nearest hundred.
            user_count = round(run_time, -2)
            return (user_count, self.spawn_rate)

        return None
跑一段时间看看

并发控制
恒定时间间隔发起并发constant()
class MyUser(User):
    # 任务之间等待时间为3秒
    wait_time = constant(3)
在间隔期间内发起并发between()
class MyUser(User):
    # wait between 3.0 and 10.5 seconds after each task
    wait_time = between(3.0, 10.5)
constant_pacing()这个看不懂
class MyUser(User):
    # 任务每隔3秒执行
    wait_time = constant_pacing(10)
    @task
    def my_task(self):
        time.sleep(random.random())
吞吐量并发控制constant_throughput()
假设我们需要一秒5个请求,设置constant_throughput为0.1,则需要50个用户
这样才能控制50请求/秒(50rps)
class MyUser(User):
    wait_time = constant_throughput(0.1)
    @task
    def my_task(self):
        time.sleep(random.random())
运行时设置用户数为50,运行结果图,User为50,请求为5rps
这个吞吐量控制器得多说几句,
等待时间适用于任务,而不是请求,也即是,等待时间是任务(方法)的执行间隔时间,而不是请求的间隔时间
我们可以用下面的代码来验证:
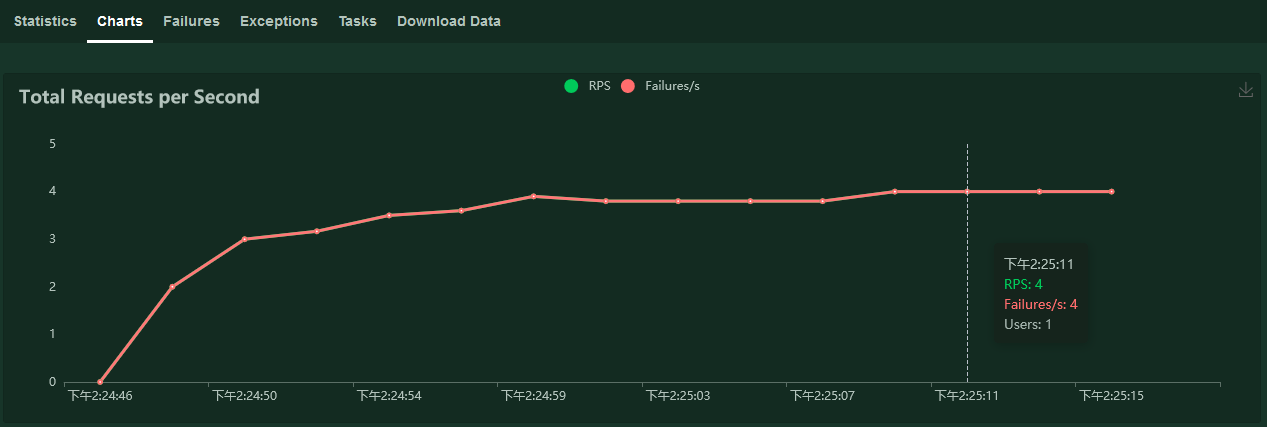
一个任务里执行两个请求,等待时间吞吐量为变量为2
from locust import LoadTestShape, HttpUser, task, constant, constant_throughput


class MyUser(HttpUser):
    wait_time = constant_throughput(2)

    @task
    def task1(self):
        with self.client.get("/123", catch_response=True) as response:
            if response.status_code != 200:
                response.failure(f"响应代码错误:{response.status_code}")

        with self.client.get("/456", catch_response=True) as response:
            if response.status_code != 200:
                response.failure(f"响应代码错误:{response.status_code}")
压测时设定用户数为1,生成率为1,等待请求稳定时,会发现稳定请求数量为4(而不是2)
本作品采用 知识共享署名-相同方式共享 4.0 国际许可协议 进行许可。
评论已关闭